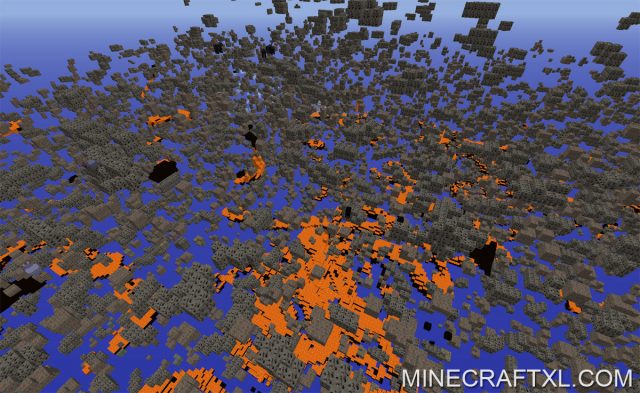
The XRay Mod (x-ray), gives the player an advantage over other players with an added ability to see special ore blocks like coal, iron, gold, diamonds etc. It was originally developed during the Minecraft beta 1.4, but have since been updated to latest Minecraft versions.
Unlike hacked clients, the xray mod does not need a hacked client to work – it’s a mod (like the name refers to). It is pretty easy to use, when it is installed, just press “X” and xray turns on. While it also works on multiplayer servers, it is not advised to use it.
Most servers do not allow abilities (cheats) like the XRay Mod, and you will simply get banned if you are found to use it. However, no known systems can detect the mod itself, but servers can have plugins installed which detect if a person suddenly finds a bunch of diamonds (which indicates the person is cheating).
Features of the XRay Mod:
- X: X-Ray
- L: NightLight
- R: Redstone Finder (bugged, dont use a switch when this is on)
- C: Better cordinates
- F: Fly (if installed)
Screenshot of the XRay Mod:
This mod changes Minecraft’s *.class files, making it incompatible with some mods (OptiFine will break some stuff).
XRay Mod Compatibilities:
The XRay Mod works with vanilla Minecraft, Forge, and LiteLoader.
How to install XRay Mod for Minecraft:
Installing the XRay Mod has become extremely simple for newer versions. Simply download the file, right-click it, and then select “Open with > Java Platform SE Binary”. This will bring up an installer from where you can chose which Minecraft Profile you want to mod, and what you want to call the new profile. Simple!
Here are the instructions for older versions of the mod (1.6 versions mainly):
There are several ways to install Minecraft mods like this. It does not require ModLoader to work. We recommend downloading the MCPatcher and using this to install the mod. You can check out our how to install mods guide, which also covers installing mods with MCPatcher. It can also be installed with Minecraft Forge.
Manual installation
- Close the Minecraft launcher if it is open.
- Navigate to the folder where Minecraft is installed (eg.: on Windows %appdata%/.minecraft).
- Go to versions folder, copy the 1.6.2 directory and name it something else (eg: 1.6.2.mods). If you have already done this for another mod, then just backup the .jar file.
- Open the .jar file (eg: 1.6.2.jar) in the mod folder you created (this can be done by using an archive utility, such as WinRar or 7zip). Copy all of the files from the Xray mods into it.
- Delete the files in the META-INF folder, except for MANIFEST.MF and close the .jar file.
- Rename the .jar file to the same name as the directory (eg: 1.6.2.mods.jar).
- Rename the .json file to the same name as the directory (eg: 1.6.2.mods.json).
- Open the .json file in a text editor. The line that contains the id (eg: “id”: “1.6.2″), needs to be changed to the same name as the directory (eg: “id”: “1.6.2.mods”). Save and close the .json file.
- Start up the Minecraft launcher.
- Create a new profile.
- Select the version that you just created (eg: 1.6.2.mods).
- Select the rest of your settings.
- Launch Minecraft and play!
Fly Mod (addon):
You will need to download and install the Fly Mod to use the “fly” feature. Fly mod requires XRay Mod to work.
Download
- Xray Mod for Minecraft 1.8.8 & 1.8.9
- X-Ray Mod for Minecraft 1.8.1 (Mirror 1)
- X-Ray Mod for Minecraft 1.8.1 (Mirror 2)
- X-Ray Mod for Minecraft 1.8 (Mirror 1)
- X-Ray Mod for Minecraft 1.8 (Mirror 2)
- X-Ray Mod for Minecraft 1.7.10 (Mirror 1)
- X-Ray Mod for Minecraft 1.7.10 (Mirror 2)
- X-Ray Mod for Minecraft 1.7.2
- X-Ray Mod v043 for Minecraft 1.6.4
- Fly Mod v043 for Minecraft 1.6.4
- Xray v042 Mod for Minecraft 1.6.2
- Fly Mod v042 for Minecraft 1.6.2


